Waxing – A Quick and Effective Way to Remove Unwanted Hair

Waxing

Waxing Langley is a quick and effective way to remove unwanted hair. It leaves skin feeling smooth and luxurious.Waxing

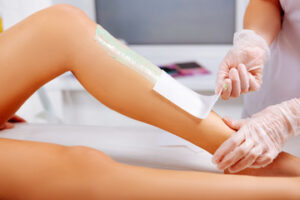
It’s also a lot less painful than shaving. It involves using an appropriate wax formula, minimizing awkward positions, and following the proper removal technique.

First, the beautician cleans the area and applies a pre-wax treatment to prevent irritation. Then, they spread a thin layer of wax in the direction of hair growth and cover it with a cloth strip.

Unlike shaving, which can cause razor burn and irritation, waxing leaves your skin smooth and hair-free for weeks. It also helps reduce the growth of unwanted hair because it rips hair from its root. However, it is important to choose a reputable salon with experienced technicians and safe waxing products. It should have documented cleaning and maintenance procedures, and all equipment and applicators should be cleaned and disinfected between each client.

In the unlikely event that you experience a reaction to waxing, there are several ways to treat it. You can cool the area with a wet cloth or apply an over-the-counter pain reliever. If the irritation is severe, you should seek medical care. You can also apply an antibiotic ointment to keep the area moist and prevent infection.

Waxing can be painful, especially on sensitive areas like the bikini line or underarms. Some people may even have an allergic reaction to the wax. It is important to inform the technician if you have any allergies, such as a sensitivity to beeswax. They can suggest a gentler wax or an alternative.

A good tip to prepare for waxing is to avoid using any medications that can make your skin more sensitive. This includes over-the-counter acne treatments and some prescription medications, such as tretinoin. Also, do not expose the waxed area to heat, such as hot tubs and saunas. If you must, it’s best to wear loose-fitting clothing to minimize friction.

If you’re concerned about a possible allergic reaction to waxing, talk with your doctor or an esthetician before making an appointment. They can recommend a safe product and provide tips on how to prepare for the treatment.

It’s also a good idea to avoid consuming caffeine or alcohol before your appointment. These can increase the discomfort. You should also avoid going to the beach or a public pool until 48 hours after your wax. This is because the sun’s harsh rays can damage your newly-waxed skin. It’s also important to exfoliate the area regularly with a loofah or scrub to remove dead skin cells.

It’s effective

Waxing is an efficient and cost-effective way to remove unwanted hair from large areas of the body. It is also safe for most skin types and is especially effective on fine, coarse hair. Waxing does not irritate the skin and is less painful than shaving. In addition to removing unwanted hair, waxing exfoliates the skin, leaving it smooth and soft. Waxing is suitable for both men and women, and can be used to remove hair from the face or body.

Hair growth is reduced after each waxing treatment, and this effect can last up to six weeks. This is because the hair is removed from the root. Shaving, on the other hand, merely trims the hair at the skin surface.

Regular waxing can also reduce the growth of new hair by preventing the hair from reaching the skin’s surface. However, it is important to avoid waxing if you are taking oral retinoids or acitretin. These medications can cause the skin to rip during the waxing process and may leave scarring behind. If you are taking these medications, you should stop them for at least two to five days before your waxing appointment.

Ingrown hairs are a common problem caused by waxing, but they can be prevented by exfoliating before and after each treatment. This will reduce the likelihood of ingrown hairs, and make it easier for the wax to grip on the hairs. You should also avoid tight clothing, which can rub against the area and cause rashes or irritation.

Another common problem is folliculitis, which can cause red bumps on the skin after a wax. This is caused by bacterial infections in the damaged hair follicles, and can result in a boil or abscess. Fortunately, this condition can be treated with an antibiotic cream.

The best time to wax is in the anagen stage of hair growth, before the hair begins to grow out of the follicle. It is not recommended to wax during the catagen or telogen stages, as this can cause breakage of the hair follicle and may lead to ingrown hairs.

It’s quick

A waxing session usually lasts about an hour, depending on the area being treated. Before the waxing begins, the therapist will wash the skin and apply some lotion to reduce discomfort. Then, the hair is removed from the follicles using the cloth strip. This process removes hair from its roots, leaving the skin smooth and hairless. It is also a semi-permanent method of hair removal, meaning that the results can last much longer than shaving.

Shaving, on the other hand, removes the hair from the surface of the skin with a razor. This can be painful, and requires you to shave regularly in order to keep the hair at bay. In addition, it can cause stubble and ingrown hairs.

Waxing is a faster and more effective way to remove unwanted hair, especially on large areas of the body. In fact, it can be a lifesaver for busy people who are on the go. This is because the results of waxing can last up to six weeks, making it a more cost-effective solution than shaving.

The benefits of waxing are obvious: it is quicker than shaving and leaves the skin silky smooth. It can also be done on sensitive parts of the body, including the bikini line and the underarms. It is important to note, however, that the hair must grow out sufficiently before you can wax it. You should exfoliate the area before your waxing appointment to prevent ingrown hairs and irritated skin.

You should always use a high-quality waxing kit and a professional beauty therapist. This will ensure that the wax adheres to the hair correctly and that it is removed properly. It is also a good idea to test the temperature of the wax on your wrist before applying it to avoid burning or damaging the skin.

It is also a good idea to take an over-the-counter pain reliever like ibuprofen half an hour before you begin your waxing session. Also, do not wax the day before or during your menstrual cycle. It will be much more painful and you may experience an infection.

It’s convenient

One of the best things about waxing is that you can get rid of a lot of unwanted hair in just one session. It can also reduce the frequency of shaving and help thin out hair growth. Additionally, waxing doesn’t leave the skin feeling irritated like shaving does.

Shaving causes the skin to become itchy and can lead to razor burn or even hyperpigmentation in certain areas of the body. It also can lead to a dull and coarse appearance that can make you look older than you actually are.

Waxing, on the other hand, is a quick and convenient way to remove unwanted hair from the face, arms, legs, back, abdomen, and eyebrows. It is also much easier to do at home or with a professional esthetician than other hair removal techniques.

Despite the benefits of waxing, it’s important to take some precautions to prevent irritation or ingrown hairs after your appointment. For starters, be sure to exfoliate before your waxing treatment and moisturize afterward. Also, avoid using any abrasive scrubs or lotions on the area until after your wax. This will ensure that your skin is squeaky clean and will help prevent ingrown hairs.

Another way to minimize ingrown hairs is to shave in the direction that your hair grows. You should also use a good quality shaver and shaving cream, and never shave dry skin. Ingrown hairs can be very painful and unsightly, and they can also cause a lot of itching.

It is also a good idea to avoid tight clothing, hot tubs, and saunas after waxing. This will help prevent chaffing and sweating, which can cause irritation. Finally, it is a good idea to apply an SPF 30 or higher sunscreen to the treated area of the skin to protect against sunburn. In addition, it is a good idea to try out both shaving and waxing to see which method works best for you.

When to Call a Chimney Repair Professional

chimney

Chimney Repair Baltimore can range from simple and quick to complex and time-consuming. Knowing when to call a professional will help minimize the repair cost. Look for rust on metal components like the damper and flue liner. Rust can cause problems, including excessive moisture that leads to spalling and freeze-thaw damage.chimney

Several things, including flooding from heavy rain, a chimney flue leak, or a damaged masonry structure, can cause water damage. Whatever the source of the leak, it is important to contact a masonry repair professional as soon as possible. Leaving these issues unrepaired can lead to mold growth, chimney failure, and costly structural damage. Homeowners can help prevent these issues by regularly inspecting their chimneys, installing a chimney cap to keep debris and rain from entering the fireplace, and promptly repairing any signs of damage.

Cracks in the chimney crown are another common problem that should be repaired immediately. The chimney crown is a sloping cement layer that covers the top of the masonry section of the chimney. This surface is designed to protect the masonry from moisture but will crack and deteriorate over time. Chimney professionals can repair these areas by coating them with a waterproof sealant. A full replacement may be required if the chimney crown is severely damaged.

Another common cause of water damage is cracked, missing, or corroded flashing. The flashing is the metal strip that connects the roof and the chimney. A chimney repair expert will inspect the flashing for any signs of rust or corrosion and replace or repair any corroded sections. Chimney repair experts can also use a special caulking compound to fill gaps between the chimney and roof.

The chimney liner is a crucial part of the chimney, as it directs smoke, gases, and other dangerous byproducts out of the home. If the chimney liner is cracked or damaged, carbon monoxide can enter the home. This poisonous gas is colorless and odorless, making it hard to detect without the help of a specialized detector. Chimney repair specialists can replace a damaged chimney liner with a new one or repair the existing one using a technique known as slip casting.

While homeowners need to sweep their chimneys regularly and monitor them for signs of deterioration, they should never attempt to repair them themselves. Fixing problems like minor cracks or a leaning chimney can be extremely dangerous. It is recommended that homeowners only seek the services of a qualified and experienced masonry repair professional to avoid any serious problems.

Mortar joints take the brunt of wall movement, foundation settlement, and exposure to weather. Mortar provides a buffer between bricks designed to crack and deteriorate before the brick itself. Still, excessive moisture damage can lead to mortar joint cracks that allow water into the home or chimney structure. Water seeping through damaged mortar joints can cause mildew growth and other issues, including structural instability, mold, and wood rot.

Traditional tuckpointing replaces deteriorated mortar with new lime-based mortar to preserve the historic brick and repair the chimney’s integrity. Mortar joint repair can be a DIY project for those with some masonry experience. Still, it’s usually best to hire a professional, especially on larger buildings or structures requiring access to safety equipment.

One way to check if the brick mortar on your building is deteriorating is by running a screwdriver or hammer along the mortar edge. If the mortar is easily scratched, it’s time to call in a professional to replace the softened mortar. Another sign is if the mortar is crumbling or the joint depth is more than 1/4″ from its original level.

Several things can cause cracks in the mortar, but the most common cause is excess moisture entering the masonry walls and freezing as it expands. Moisture that enters the masonry and freezes repeatedly can eventually lead to spalling when large chunks of mortar break off the brick and cause further water damage.

The good news is that if you catch the problem early, it’s relatively inexpensive to correct. A mortar joint sealant from most hardware stores can be applied to the deteriorating mortar joints to prevent moisture penetration and protect the chimney from further damage.

To apply the caulk:

  1. Widen the crack to at least a quarter inch with a hammer and chisel and clean the area of any loose debris or dirt that could interfere with the bonding process.
  2. Cut the caulk’s nozzle tip to match the crack’s width and load it into a standard caulk gun.
  3. Slowly draw the gun against the surface, forcing a bead of the caulk into the crack.

Brick chimneys experience much more exposure and wear and tear than other masonry structures in your home. They also have to contend with harsh indoor and outdoor environments, making them prone to damage earlier than other areas of your home. Chimney masonry that experiences severe damage will eventually begin spalling, which can result in leaks and structural problems.

When bricks spill, getting them repaired as soon as possible is important. This will not only prevent the damage from worsening but also help preserve the rest of your chimney structure. A breathable sealant can be applied to the damaged area of your chimney to keep moisture away and stop it from further damaging your masonry.

Several factors can affect brick spalling, including weather, mortar quality, craftsmanship, and age. Older bricks may be softer and need more glazing to help them resist the elements. Poor construction and salvaged bricks can also start spalling sooner than high-quality, newer bricks and masonry.

The first step in repairing loose bricks is to chip away the old mortar using a cold or flat utility chisel and short, light hammer blows. Next, you’ll need to clean the exposed area of your chimney and sand the open space down with a wire brush to improve mortar adhesion. It’s also a good idea to dust off the area with a broom and dampen it with water to increase mortar adhesion.

Once the area is cleaned and prepared, you must prepare your replacement brick. Get a matching brick and mix your mortar, following the manufacturer’s directions or standard sand, cement, and water ratios. You use a trowel to “butter” the bottom and sides of your replacement brick before pushing it into place. Ensure that the new brick is leveled and centered in the hole before applying more mortar to finish it off.

Keeping up with regular maintenance and checking for signs of damage is the best way to reduce spalling and other problems. Having a professional chimney sweep inspect your chimney annually will help to catch many issues before they have the chance to escalate and cause more costly damage.

The chimney crown is a slab of concrete that covers the top opening and keeps rain out of the flue, sparks from landing on the roof, and other debris from damaging the brick and mortar. Cracks in the crown can compromise the integrity of your chimney and lead to extensive structural damage, requiring a rebuild or removal. Chimney masonry experts recommend regularly inspecting the chimney to catch small cracks early and repair them before they worsen.

Repairing a cracked crown costs less than replacing it entirely, but it is still high enough to require careful planning. Hiring a professional for this project is best, as working on the roof for masonry work is complex and potentially dangerous. Masonry professionals use special equipment and knowledge of safety practices to ensure a safe and thorough job. They also have the specialized skills necessary to perform impossible repairs at home.

Depending on the size of your chimney and the extent of the damage, the average re-mortaring costs from $150 to $500. This process involves removing and replacing damaged sections of chimney mortar to prevent further cracking. Chimney re-mortaring is most effective before the mortar cracks and crumbles, which can usually be prevented with routine maintenance.

A deteriorating chimney crown can cause serious structural problems that could result in the collapse of your chimney, expensive water damage to your home’s ceiling and walls, or other dangerous issues. Chimney experts recommend having it repaired as soon as you notice a crack.

Chimneys are essential to a comfortable, safe home but need regular care and maintenance to function properly. By keeping up with routine inspections, you can protect your investment and spend more time relaxing and enjoying family gatherings by the fireplace. If you see signs of chimney problems, contact an experienced mason as soon as possible for a prompt and affordable repair. This will help you save money in the long run and ensure your chimney operates safely and efficiently.


DIY Pest Control

pest control

Homeowners may have to purchase pest control products and equipment and spend time applying and monitoring treatments. They can also incur additional costs if their DIY solutions fail to provide satisfactory results. Some pests, such as termites and bed bugs, require professional handling. Others, like fruit flies and mosquitoes, are easier to deal with at home. Click Here to learn more.pest control

When pests invade your home, you have several options for eradicating them. You can hire a professional pest control company to take care of the problem for you, or you can try DIY pest control methods. These methods are cheaper than hiring a professional, but they may not be as effective. In addition, they can have negative side effects on your health and the environment.

There are many different types of DIY pest control techniques, ranging from natural remedies to commercially available sprays and traps. Some are harmless to humans and pets, while others contain toxic chemicals. Many of these DIY methods do not address the root causes of the infestation, so they are unlikely to be effective in long-term. Some of these DIY methods are also ineffective against certain pests, such as termites and wood-boring beetles.

DIY pest control can be expensive, especially if you need to purchase premixed and diluted gallons of product and equipment to use it. In addition, you need to store the products properly and maintain the equipment to ensure their safety. These costs can add up quickly, especially if you have a serious pest problem.

The cost of DIY pest control can vary significantly, depending on the type of pest and the severity of the infestation. Some pests require multiple treatments on a regular schedule, while others need more intensive types of treatment. For example, ground-dwelling wasps need sprays and the physical destruction of their nests to be eliminated, while termites and wood-boring beetles require fumigation and heat treatment.

Some DIY pest control services offer a monthly, quarterly, or annual subscription fee that includes the application of chemical products to your home for preventive maintenance. These services can be a great option for homeowners who don’t want to deal with the hassle of buying and applying the products themselves. However, they are not suitable for treating a serious pest infestation.

A professional pest control service can be costly, but it’s often worth the investment to get rid of harmful insects and animals. Professionals know how to target the source of the problem, and they can also provide tips on how to avoid future infestations. In addition, a professional pest control company uses safe and effective methods that are less dangerous to your family’s health.

Do-it-yourself pest control is a popular and affordable way to rid your home of unwanted insects. It is also relatively safe, especially if you follow certain precautions. These include wearing protective gear, storing products in secure places, and keeping children and pets away from areas where chemicals have been used.

DIY pest control can take a variety of forms, including sprays, traps, baits, and powders. Each type has its own benefits and drawbacks, so it is important to carefully research the product before using it. For example, a spray may work well for eliminating a visible anthill, but it is unlikely to help you get rid of an out-of-reach cockroach nest. Similarly, traps and baits should be placed in locations that pests frequent, while sprays are best for large areas.

It is also important to remember that DIY pest control methods can be harmful to the environment and should be used with care. They can cause harm to beneficial insects and disrupt the ecosystem. In addition, they often contain toxic chemicals that can be dangerous to humans and animals. Therefore, it is important to use these methods sparingly and only when necessary.

The first step in preventing an infestation is to keep your house clean. Pests are attracted to food crumbs and moisture, so making sure that you clean up regularly can prevent them from entering your home. You should also make sure that your windows and doors are properly sealed and that there are no cracks or holes around the house. It is also a good idea to repair any leaky pipes and faucets and to make sure that your trash bins are tightly closed.

While DIY pest control is a great option for most homeowners, it is not recommended for severe infestations. Severe infestations require the assistance of a professional to ensure that they are completely eradicated. Otherwise, the pests will simply return once they are free of their natural predators. Stubbornly sticking to a DIY approach may worsen the situation and even lead to expensive repairs in the long run.

When it comes to DIY pest control, it’s important to remember that it takes time to complete the project. You need to know the habits of the pests you’re dealing with, and you must be willing to put in the work to achieve results. It’s also important to understand that certain pests may require professional treatment, as they can be dangerous and difficult to eradicate.

You can use various methods to eliminate pests from your property, such as trapping them, using pest repellents, and spraying the area with a chemical insecticide. It’s important to be committed to the process and to perform treatments on a regular basis. Failure to do so will result in an exacerbated pest problem and additional damage to your property.

You can buy a diy pest control kit at most home improvement stores. These kits come with instructions and safety precautions. They also provide a warranty to ensure your satisfaction. You can also use eco-friendly products for DIY pest control, which are less toxic than traditional chemicals. They are also safer for humans and pets. However, they may not be as effective as traditional pesticides.

In the DIY ethos that permeates almost every industry and bit of culture, many people think they can tackle pest control on their own. However, this is not always the case, and it is often better to hire a professional.

In fact, professional pest control is more effective and safer than DIY methods. This is because most DIY pest control products contain harmful chemicals that may pose a health risk to residents and pets if applied incorrectly or excessively. These chemicals may also cause environmental damage and harm beneficial insects. Moreover, some of these products may have long-term effects on the environment and can lead to the development of resistant pests.

Most diy pest control remedies aim at deterring pests from entering a home or at reducing the number of pests present in a home. However, they usually only offer short-term relief and only provide a temporary solution to the problem. They might also cause more damage to the property if they are not used properly.

Some pests, such as termites or bed bugs, require specialized knowledge and equipment for treatment. In addition, these pests are very difficult to eradicate and may require more than one treatment. In addition, they can leave behind a lot of waste and debris. This can be very dangerous to children and pets. Professionals have the requisite skills, experience and equipment to safely and thoroughly eradicate these pests.

The most common method of DIY pest control is to use a spray or aerosol insecticide. These chemicals destroy the nervous system of insects, causing them to die. The best way to ensure proper use of these products is to read the label and follow all safety precautions.

Another popular DIY pest control is to use natural products, such as lemon juice or pepper. This method is effective because the acid in these substances kills the pests, leaving them no place to hide. However, natural pesticides are less effective than their chemical counterparts and may not be able to fully eliminate the pests.

Using natural pest control methods requires time and effort, so it is not suitable for busy homeowners or those who do not have enough free time. Moreover, some of these methods do not work well on all types of pests, and they are not very effective against certain types of pests, such as cockroaches or rodents.